2007 Elddis Autoquest 100 Motorhome — Video Tour
Published 22 June 2026 · 4-berth motorhome
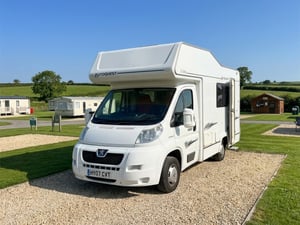
10:54This video tour walks you around the 2007 Elddis Autoquest 100, a 4-berth motorhome for sale through Motorhome Pig.
Mechanically it is built on the Peugeot chassis, with a manual gearbox, showing 38,000 miles.
The video shows the living space, kitchen and sleeping areas — this layout sleeps 4 and has 4 belted travelling seats.
It is currently available at £20,000.
Watch the full walkaround above, then open the complete listing for every photo, the full specification and to arrange a viewing.
Video transcript
OK, so this is a video of the outside of the van and where everything is. So, next to the passenger door is the fuel flap. In order to unlock the fuel flap, you just need to use the driver's key. Pop it in there, lock or unlock, that sorts that out.
The bonnet release catch is here. For the front driver's and passenger seats, they are height adjustable. You pull the tabs towards you while sitting on it and the seat will pivot in various ways. To bring it forwards and backwards, there's a bar there.
It also has lumbar support and obviously the backrest angle can be changed from there. So, I'm just going to move further around the van. As you can see, you can still pull that fuel flap open. Now, in order to access the battery compartment where the electronic hook-up cable goes, that small key there.
Pop it down. There's your leisure battery. There's where your electric hook-up cable goes. And just feed it into that little notch so that it doesn't actually catch when you close.
Lock that there. This bit is really, really important when you're actually using the van. This cover needs to pull off. It can be a little bit tricky to get off.
But whenever you're using the gas boiler and the gas fire inside, this cover always has to be off. Just pop it on. Pull that off. Good practice with that as well so that you don't forget is what I generally do is when the van's in use, just keep it on there so that before you leave the site and drive off, you've got that visual reminder that you need to put the cover back on.
In order to fill the water up, as you can see there, the water sign. So, one of these keys, two keys, very similar looking. You actually want a key that's marked as 9269. Quite simple.
Put that in there. Turn the key in the lock and then just pull that off. You use the watering can and just fill that with water. It takes generally about five watering cans full of water before that fills up.
And again, you can actually use a hose pipe should you prefer. That's a 12-volt electrical socket for a pump. It's never been used. That's just to help fill that with water.
Your drain down tanks and your water tanks. These are quite stiff. Probably do a little bit of WD-40. The grey is your dirty water.
The blue is your clean water. So, again, it's got open and closed marks on them. If for any reason you want to drain the van down and there's water inside there, then basically you just change them to the open position. When you want to drain your waste water, when the waste tank is full of all the dirty water out of the sink, just this grey one, flip that to open.
Either pop it in the black piece of plastic that I showed you, which is just inside, which we'll grab that very shortly. So, the key to open the back habitation door is the other one that looks very similar, but it's marked 9006. Just half a turn upwards to unlock, half a turn up to the right to lock. So, half a turn up, always bring the key back to that position there.
So, again, the waste water container that I've described a few on the site just to make your life a bit easier. All you would do is pop that underneath, unscrew the lid, let the water drain down into that. So, that's that. Moving around to the other side of the van.
Obviously, you've got your tow bar and tow ball electrics on there. That is only designed for a bike carrier. I don't think it's strong enough to pull a car. Which I did explain to you off when you were looking at the van.
This is where your toilet cassette goes. Again, in order to access this, you need to unlock that button. Again, it's this small key. Small key on there.
Half a turn. Click it. Click both buttons. When filling the water tank, make sure that your water doesn't ever go more than three quarters of the way up.
Because this tank is not a sealed system, otherwise the water might overflow. So, in order to fill it with water, when you need to fill that up, as you flush in the tank, that water level will drop. This top one, which has a swivelly top on it, unscrew that. Again, with a watering can, just top that up with water.
And that sorts that out. In order to empty your toilet cassette, there is a green button under there. Lift the latch towards you. Always make sure that this flap on the top needs to be pushed fully closed, otherwise you will have waste contents liable to spill out.
This then drops down. It's on wheels. And has a handle that extends out so that you can actually drag that along behind you when it's full. In order to put it back into the toilet compartment, just pop it in there, pull it back, click until you hear it click.
And again, once you've finished doing that, the best thing to do is to keep that locked. So, moving around to the front of the van, the only other thing that you have here, which again is that small key that we described earlier, plain silver small key, also turn to the left, this is for your gas. When you need to refill your LPG, any LPG station, most of which have attendants anyway, just click that off and that does that. This is a gas flow system, so it has two cylinders that you can use.
In order to turn the gas on, fully turn the knobs over to the right, where you can see that is currently on red. As I turn the second cylinder on, you will see that that cylinder then turns green. If you leave both cylinders open when the gas is fully used up in one of the cylinders, that green symbol will turn red as a visual indicator that you actually need to get more gas. So, that is everything to tell you there.
Whenever you are travelling and leaving a site, very, very important that you turn the gas off. So, left is to loosen and right is to tighten. So, right to turn it off and turning it to the left is to open it. So, both of these now turn to the right, fully turn back off again.
So, finally come back around the van, just to go through where all of your battery top-up levels are. So, again, pull the boot release, or the bonnet release, sorry. The bonnet catch on this is actually up in the middle of the bonnet. Feel up inside and you will feel the click as it lifts.
Lift that up. So, that is your brake fluid, which you shouldn't need to do anything about. That is your engine coolant, which you shouldn't need to do anything about. That is your powered steering fluid.
And that is your windscreen washer bottle for your windscreen washer fluid. Dipstick is just down there at the very front, in front of the engine. And you top the oil up just there. Air filter, should you ever need to change it, though it has recently been done when it was serviced, is just down there on the left-hand side.
And your diesel fuel filter, which again you shouldn't need to do anything with, is just there in the back corner to the side of that headlamp. So, that's pretty much everything on the outside of the van.